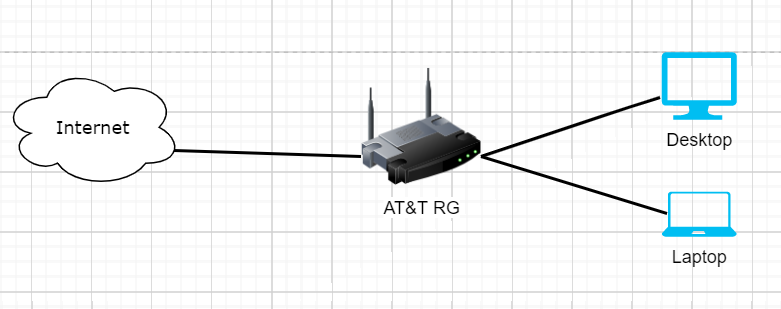
I lost a lot of data during a database failure where I also discovered my backups weren’t working. TEST YOUR BACKUPS! I had something about 8192 NAT table limitation here, if that doesn’t bother you, you don’t need to proceed unless you want to. I’ll cover the three methods (I only am aware of these 3) that I tested myself. Dumb switch, EAProxy, and full bypass.
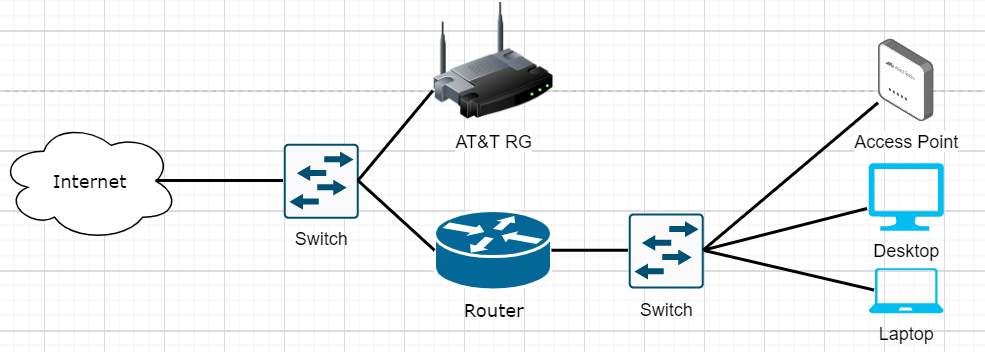
Dumb Switch Method
Simple option is the Dumb switch method, ONT into dumb switch, RG and personal router into switch. RG stays in the network and handles authenticating you to AT&T’s network, but your router handles everything else. Eliminates the NAT table issue and does NOT result in double nat. You can technically unplug the RG, but if you lose power to the switch or router, you will need the RG to auth you again. I never used this method, so take this with a grain of salt.
- set your mac address on your router to that of your RG.
- Plug ONT, RG, and your router (powered off) into the switch
- Turn on switch, wait for it to be fully up (a dumb switch should be in a ready state very quickly)
- turn on the ATT RG and let it fully establish a connection.
- Unplug RG from switch
This should work fine as long as you don’t lose power to your switch or router. If you do, you will need to start over with the process again. I strongly suggest using a UPS if you go this route.
EAProxy method
RG plugs into a port on the router, eaproxy is running on your router. RG’s authentication is proxied through your router. This eliminates the NAT table issue and does NOT result in double nat. I did NOT test ipv6 with the eap-proxy method, but it SHOULD work.
- Connect to the RG with a laptop and disable things you won’t be using (such as the wifi)
- Download eap_proxy
- scp the files onto your ubiquiti device, following the directions
- eap_proxy.sh in /config/scripts/post-config.d/
- eap_proxy.py in /config/scripts
- ssh into the ubiquiti device and mark the two files executable
chmod +x - Configure your device
- Plug the ONT into Eth0, plug the RG into Eth1, plug your LAN into Eth2
set interfaces ethernet eth0 description WAN
set interfaces ethernet eth0 duplex auto
set interfaces ethernet eth0 speed auto
set interfaces ethernet eth0 vif 0 address dhcp
set interfaces ethernet eth0 vif 0 description 'WAN VLAN 0'
set interfaces ethernet eth0 vif 0 dhcp-options default-route update
set interfaces ethernet eth0 vif 0 dhcp-options default-route-distance 210
set interfaces ethernet eth0 vif 0 dhcp-options name-server update
set interfaces ethernet eth0 vif 0 firewall in name WAN_IN
set interfaces ethernet eth0 vif 0 firewall local name WAN_LOCAL
set interfaces ethernet eth0 vif 0 firewall out name WAN_BLOCKS
set interfaces ethernet eth0 vif 0 mac  [](mac of your RG>
set interfaces ethernet eth1 description 'AT&T RG'
set interfaces ethernet eth1 duplex auto
set interfaces ethernet eth1 speed auto
set interfaces ethernet eth2 address  [](LAN IP address>
set interfaces ethernet eth2 description LAN
set interfaces ethernet eth2 duplex auto
set interfaces ethernet eth2 speed auto
set service nat rule 5010 description 'masquerade for WAN'
set service nat rule 5010 outbound-interface eth0.0
set service nat rule 5010 protocol all
set service nat rule 5010 type masquerade
set system offload ipv4 vlan enable
!
sudo /usr/bin/python /config/scripts/eap_proxy.py --pint-ip 8.8.8.8 --restart-dhcp --daemon eth0 eth1

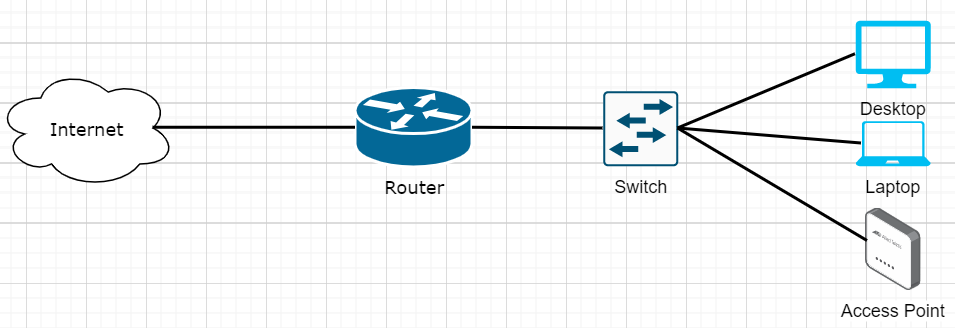
Full Bypass Method
RG is completely eliminated, you must get the certs from the RG and load them on your router. Your router must be capable of running wpa_supplicant. Your router handles authentication and everything else. The RG never needs to be plugged in.
Here is how I went about doing this with an ERL-3 for my in-laws. You should be able to do the same thing with a USG using JSON.
- I purchased a Flashcat USB
- I purchased a TSOP48 NAND
- I used a rework station and no flux (i was out)
- I used an NVG589 modem
- I desoldered the NAND, starting at 250F and slowly increasing to 500F, ensuring I covered the entire chip in heat relatively equally. This took about 5-10 minutes.
- I scraped the pins clean with an exacto blade
- I downloaded the software (i could only find a windows version)
- Opened the software and connected the flashcat via usb
- I installed the driver from the included software
- set the flashcat into bootloader mode and reset it into update mode
- updated the firmware (to 5.12) with the firmware included in the downloaded software
- dumped the bin starting at 0x000005020000 for a length of 1048577
- transferred the dump.bin over to my main workstation
- installed binwalk, jefferson github.com/sviehb/jefferson, and other required dependencies
- downloaded dls’ decode tool (at top of page)
- ran binwalk
Scan Time:     2019-10-30 13:37:45
Target File:   /root/dump.bin
MD5 Checksum:   [](redacted>
Signatures:    386

DECIMAL       HEXADECIMAL     DESCRIPTION
--------------------------------------------------------------------------------
917504        0xE0000         JFFS2 filesystem, big endian
- Entered into _dump.bin.extracted/jffs2-root/fs_1/ and moved mfg.dat into my decode folder
- ran decode
./mfg_dat_decode
802.1x Credential Extraction Tool
Copyright (c) 2018-2019 devicelocksmith.com
Version: 1.04 linux amd64

Found client certificate for Serial Number:  [](serial number>

Found certificates with following Subjects:
         [](mac address>
                                 expires  [](date>
        Motorola, Inc. Device Intermediate CA ATTCPE1
                                 expires  [](date>
        Motorola, Inc. Device Root CA ATTCPE1
                                 expires  [](date>
Verifying certificates.. success!
Validating private key.. success!
        None
WARNING: No valid server root Certificate Authority DER files found in /root/decode/linux_amd64
Successfully saved EAP-TLS credentials to
        /root/decode/linux_amd64/EAP-TLS_8021x.tar.gz
- I verified the client certificate expiration date
- Noticed a warning from the tool
WARNING! Missing AAA server root CA! Add AAA server root CA to CA_ [](redacted>.pem
I copied the AAA cert from my other CA set, but also noticed that the same AAA certs were available from a wireshark capture so not a huge deal. The AAA certs are common across multiple devices, so you can also borrow from others.
Once I had the certificates, it was time to reference DLS’ blog. I do not have permission to reprint his guide, so use the link! Basically, remove the old repo, add the new repo. Installed the packages you need and setup some scripts and then reboot. Using Eth0 as my WAN interface and Eth2 as my LAN interface, I used the below configuration. This gives me fully working ipv4 and ipv6.
interfaces {
  ethernet eth0 {
     description Internet
     duplex auto
     mac  [](mac my certs are linked to>
     speed auto
     vif 0 {
         address dhcp
         description "WAN VLAN 0"
         dhcp-options {
             default-route update
             default-route-distance 210
             name-server update
         }
         dhcpv6-pd {
             no-dns
             pd 0 {
                 interface eth2 {
                     host-address ::1
                     no-dns
                     prefix-id 1
                     service slaac
                 }
                 prefix-length /60
             }
             rapid-commit enable
         }
         firewall {
             in {
                 ipv6-name WANv6_IN
                 name WAN_IN
             }
             local {
                 ipv6-name WANv6_LOCAL
                 name WAN_LOCAL
             }
             out {
                 name WAN_Blocks
             }
         }
     }
 }
 ethernet eth2 {
     address  [](my LAN gateway ip>
     description ES-48-Lite
     duplex auto
     ipv6 {
         dup-addr-detect-transmits 1
         router-advert {
             cur-hop-limit 64
             link-mtu 0
             managed-flag false
             max-interval 600
             other-config-flag false
             prefix ::/64 {
                 autonomous-flag true
                 on-link-flag true
                 valid-lifetime 2592000
             }
             reachable-time 0
             retrans-timer 0
             send-advert true
         }
     }
     mtu 9000
     speed auto
   }
}
system {
 offload {
     hwnat disable
     ipsec enable
     ipv4 {
         forwarding enable
         gre enable
         vlan enable ! [](-- critical!!
     }
     ipv6 {
         forwarding enable
         vlan enable ! [](-- critical!!
     }
 }
}
Note: if your firmware is old enough on the AT&T RG, there are a number of exploits you can use that will allow you to get the cert bundle from the device WITHOUT desoldering. I was not lucky enough in any of my ebay purchases to get an old enough firmware.
Note2: I was selling cert bundles from 20-50$ each, each RG costs 15-25$ so i was able to use the extra proceeds to make back my investment on the rework station and other requisite tools. I’m not sure what the cert selling market looks like anymore, but I imagine you can still purchase the gear and break even in a few months.
Some source material I used during this adventure but specific shoutouts to the dslreports community, I couldn’t have set any of this up without you all and especially DLS for the decode tool and extra mile he went to help out!
- https://www.dslreports.com/forum/r32295765-AT-T-Fiber-Any-way-to-bypass-att-modem-using-ASUS-GT-AC5300
- https://www.devicelocksmith.com/2019/01/configuring-8021x-authentication-using.html
- https://www.dslreports.com/forum/r32595106-AT-T-Fiber-Another-ATT-Gateway-Bypass-Thread
- https://www.dslreports.com/forum/r32115464-Bypassing-gateway-with-ERL-and-eap-proxy-question
- https://www.dslreports.com/forum/r32426308-AT-T-Fiber-Using-Asuswrt-Merlin-to-bypass-RG
- https://www.dslreports.com/forum/r31900599-ATT-TrueBridge-Mode-for-for-Ubiquity-Security-Gateway-USG~start=210
- https://medium.com/@mrtcve/at-t-gigabit-fiber-modem-bypass-using-unifi-usg-updated-c628f7f458cf